v3.0, {2025-09-04}

Yareta has two main functions, archiving data or searching for archives. (see HOW TO UPLOAD a dataset and create an archive or SEARCH FOR DATA in Yareta)
Yareta is a trusted data repository that enables Geneva HEI researchers to archive and preserve their research data. The archived research materials can be accessed, reviewed, and retrieved by anyone (unless special access mechanisms are defined by uploaders).
Using Yareta increases the visibility of research through data sharing and citation. This tool is aligned with the FAIR principles and is compliant with national and international standards. It supports all types of data formats. By using it to archive data, you ensure long-term digital preservation for your data and make sure it is stored within secure data centers located in the canton of Geneva.
PORTAL OVERVIEW
The Yareta Portal allows you to SEARCH FOR AN ARCHIVE (public access) or CREATE A DEPOSIT (authenticated access). When you are authenticated, as a user, you may:
-
gain access to and request access to non-open access data archives.
-
create deposits to generate data archives.
Once you are logged in, the Yareta Portal is structured according to four major sections:
-
HOME – The homepage, where you can search for an existing archive or for Organizational Units or start creating an archive.
-
DOWNLOAD HISTORY – The place where you can see all previously downloaded data archives.
-
DEPOSIT – The place where you upload your datasets and generate new archives.
-
PRESERVATION SPACE – The place where you manage your Organizational Unit(s), team and deposits.
Profile Menu
In the top right-hand corner, you can access your profile by clicking on your initials. The menu offers 6 options:
-
Profile
-
User guide
-
Token
-
Guided tour
-
Choose the dark/light mode
-
Log out
Profile settings
Your profile contains personal information and administrative information. You can only modify your personal information. In this section, you can connect Yareta to your ORCID ID. Doing so makes a button appear on your Yareta archives, allowing you to send information about the dataset to your ORCID profile.
| To know more about ORCID ID, see this website. If you want to create an ORCID account, click here. If you want to know more about ORCID and how to use it, check our training sessions. TIP: See also the Add to ORCID video tutorial or the ORCID section of this guide. |
In your profile, you can also choose the email notifications you want to receive or not, according to the different roles you have in the Organizational Units.
| See also the Activate emails notifications video tutorial. |
HOW TO UPLOAD a dataset and create an archive
In order to deposit your data, you need to be a member of an Organizational Unit (OrgUnit). Once this is done : Go to the DEPOSIT > CREATE NEW DEPOSIT. If you have access to several Organizational Units (OrgUnit) make sure before starting a deposit that the right one is selected in the top-left dropdown menu.
PREREQUISITE
Request an Organizational Unit (OrgUnit)
In order to deposit your data, you need to be a member of an Organizational Unit (OrgUnit):
-
If you do not have an Organizational Unit:
-
ask to join an existing one: Go to > PRESERVATION SPACE > ORGANIZATIONAL UNITS (OrgUnit) > Search for an OrgUnit > REQUEST MEMBERSHIP or
-
ask for the creation of a new Organizational Unit: Go to > Getting started.
-
OrgUnit settings
Who can change them?
-
The manager = the person who requested the OrgUnit creation and has received the OrgUnit creation confirmation e-mail. See Organizational Unit, Members and Roles for more information about the role of Manager and read our Good practices
-
As a MANAGER, you can edit your Organizational Unit to complete its information, default settings and add team members: Go to > Preservation Space > Organizational Units. Then search for the name of your Organizational Unit and click on the correct line to open the details of your OrgUnit.
Adding members / changing members’ roles & permissions
-
On the detail page of the OrgUnit (see above how the manager can reach it), at the bottom, you will see > Organizational Unit Members. Click on the [+ Add] button at the bottom of the list. You are now in the edit mode so you can type the name and assign a role to the new member. To validate your entry, you must scroll up and click on the “Save” button.
-
To change the role of one of your team members: Go to > PRESERVATION SPACE > ORGANIZATIONAL UNITS > Search for your OrgUnit> Organizational Unit Members (at the bottom of the page). Click on the pencil next to the person’s name. You are now in the “edit mode” and can change roles. To validate your entry, you must scroll up and click on the “Save” button.
Prior to being attributed a role by the MANAGER, each team member has to log onto the Yareta Portal with their own institutional login (Switch edu-ID). Once this is done, the person’s user profile will automatically be created as user in Yareta, and the MANAGER can then add them to the team with the button +Add.
See Submission Policy and Preservation Policy as well for more information about OrgUnit settings.
Change an OrgUnit Logo
Each Organizational Unit in Yareta can upload its own logo to establish a unique visual identity and stand out among other units. By default, the Yareta logo is displayed.
To change the logo:
-
Go PRESERVATION SPACE > ORGANIZATIONAL UNITS and click on the Organizational Unit for which you want to change the logo.
-
In the preservation space, click on the current logo.
-
Upload your image file (accepted formats: .jpeg, .jpg, or .png), then click Save.
Once uploaded, your custom logo will replace the default Yareta logo on all your future uploads.
PREPARING YOUR DATA FOR UPLOAD
The UNIGE website Research Data was created to help and support researchers in the management of their research data. Advice on best practices from planning to publication of research data are provided. Here are some of the key best practices to help you to properly deposit your research data in Yareta.
-
Do you use personal and/or sensitive data? Please ensure your data are anonymized before archiving them in Yareta. > Help
-
All file formats are accepted in Yareta but the use of open file formats suitable for preservation is strongly recommended. > Help. See also Data Compliance Level
-
Select carefully your data before archiving them, the data you produced during your research are maybe not all relevant for archiving. > Help
-
Name and organize properly your files to make your data understandable and reusable. > Help
-
Choose the appropriate license to publish your research data in open access. > Help. See also The Creative Common licenses
UPLOAD WORKFLOW
Go to the DEPOSIT > CREATE NEW DEPOSIT.
| If you have access to several Organizational Units (OrgUnit), make sure before starting a deposit that the right one is selected in the top-left dropdown menu. |
1. Edit the METADATA
-
Fill in the metadata form. The metadata required in this form follows the DataCite requirements. This makes your research data findable and citable.
| Some metadata are displayed by default in the form. Please modify and adapt them to your new deposit if necessary. |
| To help you, tooltips are available for each form field. Move the mouse on the field and get information about the metadata. See also the Edit metadata video tutorial |
-
Then SAVE the metadata form > Your new deposit is moved in the IN PROGRESS tab.
See The DataCite metadata schema, Rich metadata and Related fields: access level - sensitivity level – data use policy for detailed explanations about some of the metadata fields that you must complete.
2. Add RESEARCH DATA
Go to the FILES tab.
| The maximum allowed size is 6Gb per file, but several files may be uploaded at the same time. Bigger volumes can be uploaded on demand: please read the FAQ for uploading large volumes. See also the Import large datasets video tutorial |
You have three options to add your research data to your deposit:
-
UPLOAD PRIMARY DATA: upload one or more files containing observational, experimental, reference, simulation, derived or digitized data.
-
STRUCTURED UPLOAD: upload a zip file which will then be decompressed while preserving its contents' folder structure.
-
ASSOCIATE ARCHIVE: add an existing data archive to create a COLLECTION.
| Collections are useful for linking archives that pertain to the same project but have been organized and archived separately. For example, if you have amassed large amounts of data over many years, you may choose to archive them in separate deposits which you will have affixed with different time periods for clarity’s sake and then create a collection from the resulting archives to have them all grouped in one convenient location – and with a single DOI. |
Once you have either added your first data file, or uploaded a zip file, two additional uploading options will be unlocked:
-
UPLOAD SECONDARY DATA – upload one or more files containing publication, data paper or documentation.
-
ADVANCED MODE – upload special data (e.g. readme file, thumbnail, software or Information Packages).
See the chapter Rich metadata in the Key Concept to know more about it.
| Some files contain patterns that our system identifies as extraneous to your research data and are therefore classified as "excluded" or "ignored". These files must be deleted, or manually approved in the case of "ignored" files. See below. |
3. Solve possible file problems
Data file statuses may reflect file problems. Indeed, once uploaded, the files will undergo a few automatic checks by the system and display a final status. Eventually, all the files should have the status READY, to be able to go on with the deposit and finalize the archive in Yareta.
But they may display different statuses:
-
Some statuses are temporary, indicating the current check being made by the system (eg. RECEIVED, VIRUS CHECKED, FORMAT IDENTIFIED, etc.).
-
Other statuses display the result of the system checks (e.g. EXCLUDED FILE, IGNORED FILE, IN ERROR). You can sort or filter amongst your deposit files to view non-ready statuses and solve them, individually or in bulk.
Here is what to do with the most common problems:
-
EXCLUDED FILE - The system has identified the file as being extraneous to your research data and must therefore be deleted. Select the line using the checkbox on the left or the … on the right of the line and chose Delete.
-
IGNORED FILE - The system has identified the file as being possibly extraneous to your research data and must therefore be manually approved or deleted. While not extraneous to your research data, compressed file formats will be marked as ignored as the system will be unable to automatically document the file’s contents’ metadata. If you must upload compressed files, you will be required to upload a README file alongside it to describe its contents for end users. Select the line using the checkbox on the left or the … on the right of the line and chose Delete or Do not ignore.
-
IN ERROR - An error has occurred. Click on … on the right side of the line and choose show history status. Have a look at the error report and contact us (Yareta IT Support) if necessary.
See File statuses for all the different statuses and their explanation.
Generate an anonymous link for reviewers
When submitting an article to a journal, authors may be asked to provide access to the data used in it. However, in the case of a (double-)blind peer-review, the reviewers should not be able to identify the article and data’s authors.
In Yareta, while the deposit is still in progress, you can generate an anonymous webpage in which editors and reviewers will be able to access the data. Only data will be available, without any identifying information.
To do so, click on the Peer Review button: a webpage will be created. Its URL may then be shared with the journal’s editors.
If you need to modify your dataset, process the changes in the deposit, then click on Regenerate peer review. The new data will be available with a history of previously shared data.
Once the dataset is archived (submitted) in Yareta, the page will still be available but will be redirected to the finalized archive.
| The webpage does not provide any information about the dataset’s authors. However, some may be found in the dataset itself: make sure to remove all of it before sharing your data with editors. The page’s only purpose is for peer-review: it should not be used to archive or cite a dataset. |
| See also the Generate a peer review video tutorial. |
4. Click on submit and generate the archive
Once your data files are all uploaded with the READY status and your metadata is completed, SUBMIT your deposit to launch the archiving process which will create the archive.
| Before submitting your deposit, please ensure that your data are ready and no longer need to be modified. Indeed, data files that were archived (COMPLETED status) can no longer be modified or removed. |
Depending on your Organizational Unit settings, the deposit will either directly undergo the archiving process, or an approval step might be required. Please find more information about deposit status in the dedicated section : Data/Archive statuses
Here are the most frequent statuses during a regular workflow in Yareta: IN PROGRESS → SUBMITTED → IN VALIDATION → APPROVED/ REJECTED → CHECKED → COMPLETED.
| See also the Create a Deposit video tutorial |
Linking datasets with publications
You can link your datasets in Yareta to related publications in an institutional repository, like Archive ouverte UNIGE. To do this:
-
Indicate in the Yareta deposit that the dataset is underlying or supporting data for a specific publication.
-
Include a direct link to the article’s record in the institutional repository.
This helps create a transparent, interoperable chain between your data and your publications, reinforcing your research’s visibility and impact.
5. Editing a Deposit / an Archive
As long as the deposit has not been submitted for archival (= is in the In progress or Invalidation tabs of your Organizational Unit interface), everything can be changed: files as well as metadata.
Once a deposit has been archived (= has a COMPLETED or CLEANED status), its data files contents cannot be changed anymore. However, the archive’s metadata can still be edited. This means information about the data archive can be changed, as access level, title, contributors, description, or any field on this screen. To do so, go to the Completed tab in your Organizational Unit and click on Enable metadata editing. Make the desired changes and click on the Submit button.
| See also the Edit an archive’s metadata video tutorial |
See Deposit vs Archive for more information.
6. Delete Archives and Data
Yareta is designed for long-term preservation. Therefore, once a deposit is submitted, it becomes an archive and can no longer be modified or withdrawn by users.
At the end of the retention period, the data files will be permanently removed from the platform, but the metadata record will remain publicly visible as a "tombstone". This ensures the archive’s existence is still documented and that any persistent identifiers (such as DOIs) continue to point to a valid landing page.
See DOI for more information.
Deleting Incorrect or Erroneous Archives or Data
Deleting archived data is impossible in Yareta. If you have completed your deposit but realized that the data files are incorrect, at this stage, neither you nor the Yareta technical team can delete or modify the archive. Yareta is designed to preserve all deposits exactly as submitted, in accordance with its long-term preservation mission. In such cases, please follow these steps:
-
Set the archive’s access level to "Closed" to make it no longer publicly accessible.
-
Reduce the retention period to the shortest allowable duration.
-
Create a new deposit with the correct data. To avoid confusion, we recommend clearly indicating that it is a revised version (e.g., version 2) in the title or metadata.
At the end of the shortened retention period, the archive will follow the standard deletion process for data files (see next section). However, please note that the metadata of the original archive will remain permanently visible as a "tombstone", preserving the record of submission and ensuring that persistent identifiers (such as DOIs) continue to resolve correctly.
See Access Level for more information.
Deleting Archives / Data at the end of the retention period
Your archive has reached the end of the retention period defined at the time of deposit. At this point, the Yareta team will contact you to confirm whether the dataset should be deleted or preserved for longer.
You have two options:
-
If you still need to keep the data, you can request an extension of the retention period.
-
If you confirm that the data are no longer needed, the files will be permanently deleted from the platform.
Regardless of the outcome, the metadata will remain permanently visible as a "tombstone", preserving the existence of the dataset and ensuring that any persistent identifiers (such as DOIs) continue to resolve to a valid landing page.
This process ensures that even if the data itself is removed, the archive remains part of the scholarly record and traceable over time.
SEARCH FOR DATA in Yareta
To SEARCH FOR AN ARCHIVE, go on the homepage and click on "Search for an archive": You will be redirected to the search results page. By default, if no search terms are entered, the page displays all published archives currently available in Yareta.
Use the search bar at the top to enter keywords related to the archive you are looking for (e.g., title, creator, or subject).
You can then narrow down the results by applying filters such as Organizational Units, Publication Year, Access Levels, etc.
| Filters can be applied even without entering any search terms. |
Advanced Search mode
You can also use the Advanced Search mode for more precise queries. In this mode, the search is strict and requires exact terms to return results. To perform a broader search, you can use the * operator to prefix and/or suffix your search term.
Example: '*dlcm*' allows you to search any archive containing the word 'dlcm'
*: Allows you to search for any characters
Example: proj*' allows you to search for archives containing a word beginning with 'proj'
? : Allows to replace a character
Example: 'dl?m' allows to search for archives containing a word beginning with 'dl', ending with 'm' and with only one character between these two strings
AND : Allows you to create a logical 'and' between two search conditions
Example: 'dlcm AND projects' allows you to search for archives containing the words 'dlcm' and 'projects'
"…" : Allows to encapsulate search conditions, useful with the word 'AND'
Example: 'dlcm AND "atom projects" ' allows you to search for archives containing the words 'dlcm' and 'atom projects' === View a result To view an archive’s metadata and files, click on its tile. You will be redirected to the archive’s metadata page.
-
Anyone can browse the metadata published archives in Yareta.
-
Anyone can download files for archives with a Public access level.
-
Only registered users can request access to files of archives with Restricted or Closed Access level.
| See also the following video tutorials: |
-
Search for an archive video tutorial.
-
Do a selective download video tutorial.
-
Preview a file from an archive video tutorial.
-
Request access to restricted archives video tutorial.
KEY CONCEPTS
Organizational Unit, Members and Roles
An Organizational Unit (OrgUnit) is an administrative entity that may be associated with a research project, a laboratory, a department or any other organizational group of researchers. An OrgUnit can be composed of several members and several archived datasets.
There are no specific institutional requirements regarding the management of OrgUnits. However, a mandatory role is the Manager, who is responsible for properly managing and monitoring their OrgUnit, as well as ensuring the quality of metadata and uploaded data. It is also the person responsible for paying the invoice, if any. See Good practices for more information.
The Manager of the OrgUnit can add members to their team and assign them roles dedicated to accessing, creating, validating and managing deposits and archives. Here’s an overview of all the roles in Yareta:

(1) Data Steward is a recommended role that brings added value to an Organizational Unit (2) Depends on the chosen submission policy: Deposit without approval > Creator // Deposit with approval > Approver
Adding members to an Organizational Unit
To add members to the OrgUnit, they need to log in to Yareta with their SWITCH edu-id once. This initial connection to the tool adds them to the database, enabling them to be found by the Manager.
Then, the Manager add members: in the Preservation space > go to Organizational Unit > select your OrgUnit > click on the +[Add] button at the bottom of the list of Organizational Unit members > search for the Person's name and select a Role for them > click Save.
Deposit vs Archive
Yareta transforms deposits into archives. In other words, data uploaded into Yareta is considered a deposit at first (see button “Create a new deposit”), before it is preserved in a fixed form and becomes an archive.
A deposit:
-
Is only visible for the uploader and their team.
-
Is fully editable: the metadata can be changed, files can be added and removed, etc.
-
Can have a DOI (if reserved) but it will not work yet.
-
Once ready, a deposit can be Submitted and turned into an Archive.
Archives differ from deposits, in the sense that:
-
their existence is visible to everyone (information in their metadata section will be made public in the search interface), regardless of the data access level.
-
they have a working DOI.
-
their data files cannot be changed anymore. Only the metadata can be edited.
File statuses
Your data files may display the following statuses:
-
CHANGE RELATIVE LOCATION - The file’s relative location is being updated. For example, it is being moved from folder A to folder B.
-
CLEANED - The system has purged the contents of your file.
-
CLEANING - The system is purging the contents of your file to make space.
-
EXCLUDED FILE - The system has identified the file as being extraneous to your research data and must therefore be deleted.
-
FILE FORMAT IDENTIFIED - The system has identified the file’s format.
-
FILE FORMAT UNKNOWN - The system was unable to identify the file’s format.
-
IGNORED FILE - The system has identified the file as being possibly extraneous to your research data and must therefore be manually approved or deleted. While not extraneous to your research data, compressed file formats will be marked as ignored as the system will be unable to automatically document the file’s contents’ metadata. If you must upload compressed files, you will be required to upload a README file alongside it to describe its contents for end users.
-
IN ERROR - An error has occurred. Have a look at the error report and contact us (Yareta IT Support) if necessary.
-
PROCESSED - The system has processed the file.
-
READY - The file is ready to be archived; all files in your deposit must be ready to submit it.
-
RECEIVED - The system has received your file, and it will now be processed.
-
TO PROCESS - The file is about to be processed.
-
VIRUS CHECKED - The antivirus has analyzed your file.
Some statuses are temporary, indicating the current check being made by the system (eg. RECEIVED, VIRUS CHECKED, FILE FORMAT IDENTIFIED, etc.), other display the result of the system checks (eg. EXCLUDED FILE, IGNORED FILE, IN ERROR).
Data/Archive statuses
Throughout the archival process, your deposit may display different statuses:
-
APPROVED - The deposit has been validated by an APPROVER (Only if you select the submission policy "Deposit with approval", see Submission Policy).
-
CHECKED - An automatic step in the archival process.
-
CLEANED - The system has purged the contents of your deposit.
-
CLEANING - The system is purging the contents of your deposit to make space. Of course, this process is only launched once your deposit has been archived and secured on all our storage nodes.
-
COMPLETED - The archive has been properly generated; an XML file has been created, and a DOI is automatically assigned to your dataset. In this stage, your deposit has become a data archive, and its files can no longer be modified or removed.
-
IN ERROR - An error has occurred. Have a look at the error report and contact us (Yareta IT Support) if necessary.
-
IN PROGRESS - The deposit has not been submitted and can be modified.
-
IN VALIDATION - The deposit has to be approved or rejected by a member who has the role of APPROVER (Only if you select the submission policy "Deposit with approval", see Submission Policy) or a higher role (see Organizational Unit, Members and Roles).
-
PAUSED - The archiving process has been paused.
-
REJECTED - The deposit has been rejected by an APPROVER (Only if you select the submission policy "Deposit with approval", see Submission Policy). Consult your APPROVER. See Organizational Unit, Members and Roles and enquire as to why your deposit has been rejected and modify it according to feedback.
-
SUBMITTED - the user has submitted the deposit.
-
REJECTED METADATA EDITING - a member of the Organizational Unit had made changes to the archive’s metadata but those were then subject to approval by the orgunit manager/steward and were rejected.
-
CANCELING METADATA EDITING - a member of the Organizational Unit has started to edit the archive to change some of its metadata before the same person or another member of the organizational unit decided to cancel the changes.
-
EDITING METDATA - a member of the Organizational Unit has started to edit the archive to change some of its metadata.
DOI
A DOI (Digital Object Identifier) will be automatically attributed to your deposit (archive) when the archiving process has ended (deposit with COMPLETED status).
| If you wish to get a DOI before the archiving process is completed, you may already request a DOI while editing the deposit’s METADATA with the top-right button RESERVE DOI as soon as your deposit is in the IN PROGRESS DEPOSIT step. |
If you delete a deposit for which you have reserved a DOI before triggering the archiving process (DEPOSITS > IN PROGRESS), the reservation will be cancelled, and the DOI will not be recorded in the DOI System.
ORCID
ORCID (Open Researcher and Contributor ID) is a unique, free, persistent identifier that distinguishes individual researchers and connects them to their work across systems, platforms, and institutions. You can easily and quickly create your ORCID account. Just go to the ORCID website and fill in the form. If you want to know more about ORCID and how to use it and set it up, the Library offers regular training sessions.
ORCID in Yareta : Yareta uses ORCID to identify and credit contributors accurately. When an ORCID iD is linked to a Yareta account, the ORCID icon will be displayed beside the contributor’s name on Yareta public webpages (e.g. on an archive detailed webpage). This information will also be recorded in the DOI metadata. Finally, the researcher also has the possibility to send archives to their ORCID profile. If they wish to do so, the button is available on the archive webpage.
The DataCite metadata schema
The DataCite Metadata Shema was designed to support dataset citation, discovery and persistence. The DataCite metadata are:
-
Intended to be generic to the broadest range of research datasets.
-
Not intended to replace the discipline or community specific metadata.
Please ensure that the specific metadata are completed and relevant to your dataset to make it reusable. You need to add these specific metadata within your archive (included in datasets). Yareta only provides you with a metadata form for generic metadata (DataCite). If you need help, contact your Research Data Contact Point. See Research Data Support
Rich metadata
When depositing data in Yareta, it is important to provide metadata to ensure the archive will be FAIR (Findable, Accessible, Interoperable, Reusable). Metadata can be provided in different forms, and through the different tabs of a deposit:
-
Metadata tab of the deposit - Invites you to fill in the most important information about the dataset. Some fields are mandatory, others are not. Information added here will be made available in the search interface (no matter if the data access is public or not) and follows the DataCite metadata schema.
-
Data tab - Allows you to upload a metadata file (in DataCite or another format), using the advanced mode. (Please note that primary data need to be added first, for the “Advanced mode” possibility to appear.)
Go to FILES > ADVANCED MODE, select the Data category: PACKAGE and the Data type: METADATA (for DataCite metadata) or CUSTOM METADATA (for metadata in another schema).
The CUSTOM METADATA type allows you to define a metadata schema in a format that is unique and meaningful to your field of research, such as XML or JSON. Yareta validates both the type (format) of the file and its content (structure) against the metadata schema. Contact us (Yareta IT Support) to request a new metadata schema to be uploaded to Yareta.
-
In the form of a Readme file - Either by uploading a Readme file, or by writing it on the fly. This will be made public in the search interface as well, no matter if the data access is public or not.
See also the Edit a README video tutorial, and the institutional dedicated webpage (UNIGE, IHEID or HES-SO)
The Creative Common licenses
The CC licenses allow you to protect your rights as an author when publishing your research data in open access (see Access Level). Creative Commons proposes one public domain dedication tool and six licenses that are briefly presented below.
| You may ask us to assign any other license to your data. Let us know at Yareta IT Support. |
The Creative Common licenses
-
CC0: The Creative Commons Public Domain Dedication allows creators to give up their copyright and put their work into the worldwide public domain. CC0 allows reusers to distribute, remix, adapt, and build upon the material in any medium or format, without conditions.
-
CC BY: This license allows reusers to distribute, remix, adapt, and build upon the material in any medium or format, so long as attribution is given to the creator, and modifications are documented. The license allows for commercial use.
-
CC BY-SA: This license allows reusers to distribute, remix, adapt, and build upon the material in any medium or format, so long as attribution is given to the creator, and modifications are documented. The license allows for commercial use. If you remix, adapt, or build upon the material, you must license the modified material under identical terms.
-
CC BY-NC: This license allows reusers to distribute, remix, adapt, and build upon the material in any medium or format for noncommercial purposes only, and only so long as attribution is given to the creator, and modifications are documented.
-
CC BY-NC-SA: This license allows reusers to distribute, remix, adapt, and build upon the material in any medium or format for noncommercial purposes only, and only so long as attribution is given to the creator, and modifications are documented. If you remix, adapt, or build upon the material, you must license the modified material under identical terms.
-
CC BY-ND: This license allows reusers to copy and distribute the material in any medium or format in unadapted form only, and only so long as attribution is given to the creator, and modifications are documented. The license allows for commercial use.
-
CC BY-NC-ND: This license allows reusers to copy and distribute the material in any medium or format in unadapted form only, for non-commercial purposes only, and only so long as attribution is given to the creator, and modifications are documented.
To sum up:
-
BY – Credit must be given to the creator. Modifications are documented.
-
SA - Remix, adaptations or other derivatives of the work must be shared with the same license.
-
NC – Only noncommercial uses of the work are permitted.
-
ND – No derivatives or adaptations of the work are permitted.
| Note that with the CC0 public domain dedication, no credit must legally be given to the contributor (author). It nevertheless remains a scientific good practice to indicate the source and original creator of a work when it is reused, as per research integrity guidelines. |
| CC licenses are only suitable for data or datasets that are copyrightable works, in the sense of Swiss copyright law (meaning they fill three conditions: made by a human being, have an original character and are perceivable to the senses). If the data doesn’t meet those criteria (e.g. it is too factual or created by a measuring instrument), then CC0 is the only possibility. |
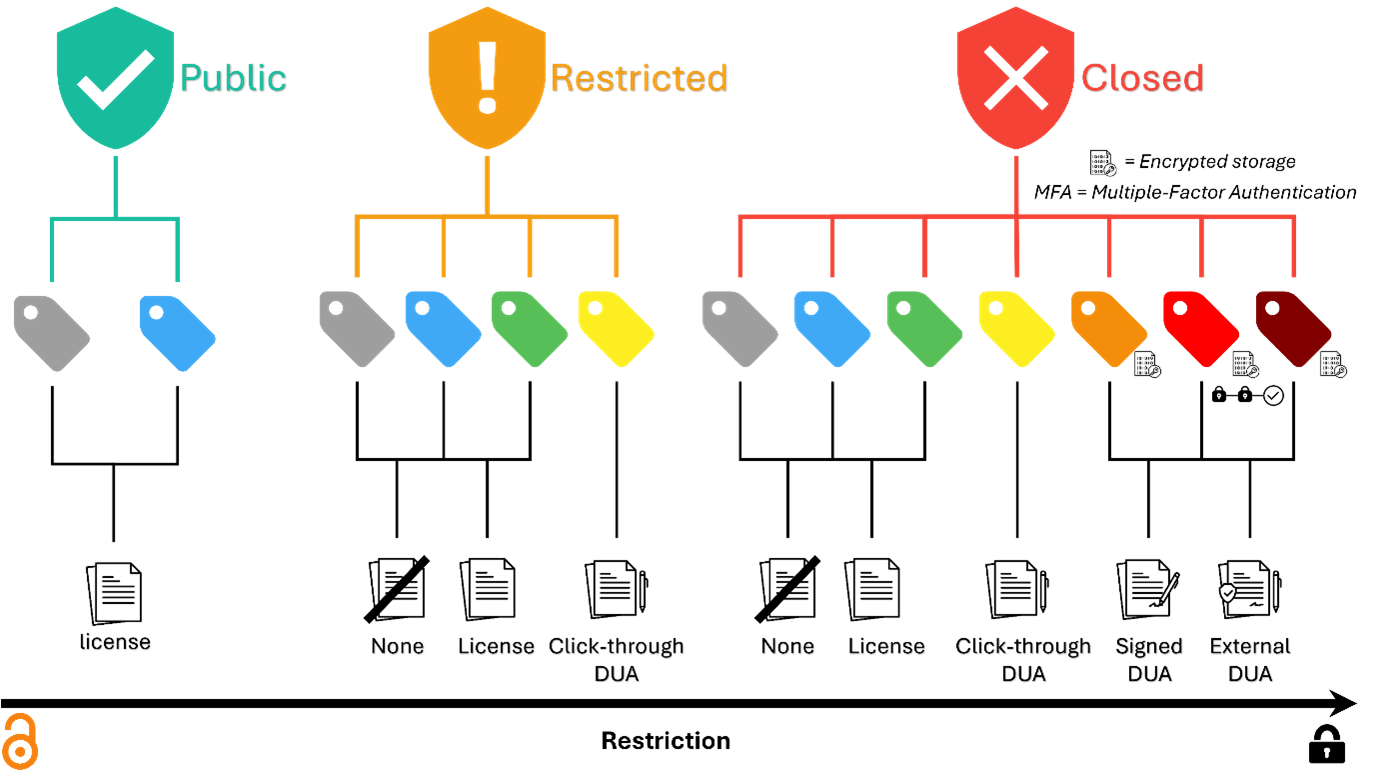
Access Level
The access level corresponds to the level of restriction/authorization for viewing and downloading the data archive. Please note that no matter which access option you select, the metadata itself always remains visible, in line with the FAIR principles.
There are 3 access levels. You must select one:
-
Public > public to everyone.
-
Restricted > restricted to team members (See Organizational Unit, Members and Roles).
-
Closed > Restricted to the team’s manager, the deposit’s creator and any person designated by the creator or the team manager.
| To download data under restricted or closed access, a request for access can be made. |
See also the Request access to restricted archives video tutorial

There is also the option to assign an embargo to postpone the open publication of your data.
-
For example, you have a deposit that is ready, but you only want it to be public in 3 months. You can wait 3 months, or you can submit it now with an embargo of 3 months and the access level restricted/closed.
How to set up an embargo?
-
First, you need to choose the level of access the archive will ultimately have. For example, access level: public.
-
Then, after you enter the other information (sensitivity level and data use policy), you have a checkbox with an option “The deposit has an embargo” that you can click.
-
When you activate it, you can choose the access level during the embargo and the embargo duration (in months). For example, access level: restricted; duration: 3 months.
In this example, at the end of the 3 months, the restricted access level of the deposit will automatically change to “Public”.
Sensitivity Level
The Sensitivity of data is defined according to the DataTags System for sharing sensitive Data with Confidence (Sweeney L, Crosas M, Bar-Sinai M. , 2015, https://techscience.org/a/2015101601/). A DataTag is a set of security features and access requirements for file handling.
To contribute to the impact, transparency and reproducibility of scientific research, funders and publishers mandate the sharing of data where possible. However, data containing confidential or personal information cannot be shared openly without appropriate safeguards. Sharing data subject to confidentiality clauses or which can raise ethical issues (influence the environment, health, safety or have a potential for military use for instance) must also comply with the appropriate requirements. An extensive body of statutes, regulations, institutional policies, consent forms, data sharing agreements, and best practices govern how confidential data or personal information should be used and disclosed in different contexts. DataTags help navigate these complex issues, enabling data sharing in a secure and legal way while maximizing transparency. Each tag provides a well-defined prescription that defines how the data can be legally shared.
In Yareta, six standardized DataTags levels were defined from public to most restricted level, depending on the Access level chosen:
-
blue = non confidential information.
-
green = not harmful personal information.
-
yellow = potentially harmful personal information.
-
orange = sensitive personal information.
-
red = very sensitive personal information.
-
crimson = maximum sensitive personal information (CAUTION: this option is only partially supported)
| For more details, see the sensitivity level description |
| If you need further information or more details about the different levels of sensitivity at UNIGE, you can check the dedicated website https://cybersecurite.unige.ch/je-gere-des-donnees/sensibilite-des-donnees. You will find examples for each category. |
Source: Sweeney L, Crosas M, Bar-Sinai M. Sharing Sensitive Data with Confidence: The Datatags System. Technology Science. 2015101601. October 15, 2015. https://techscience.org/a/2015101601/
Data Use Agreement
A Data Use Agreement is a contractual document used for the transfer of data that are not shared publicly or are subject to restrictions on reuse (for example, based on the consent of study participants). Depending on the sensitivity of the data, a DUA is mandatory in Yareta. There are three types of DUA implemented:
-
Click-through DUA: it is stored in the archive and is approved when the user clicks to request access.
-
Signed DUA: it is stored in the archive. It must be downloaded, signed and provided when the user request access.
-
External DUA: it is managed and stored externally, so not in the archive. The control is done outside Yareta.
See also the Modify a DUA video tutorial
Related fields: access level - sensitivity level – data use policy
In the Metadata section of a deposit, there are three linked fields to be filled in. These are:
-
Access level.
-
Sensitivity level.
-
Data use policy.
Depending on the Access level chosen, only certain Sensitivity level options can be selected. For example, it is not possible to select a Public Access level for data with a red sensitivity (= very sensitive personal information), as this type of data cannot be shared freely.
Then, what depends on the Sensitivity level is the Data use policy that can be selected. For sensitive or very sensitive data, it is possible to choose between several types of Data use agreements. For data with no confidentiality issues, it is possible to choose a License (see The Creative Common licenses).
All possible combinations are shown in the image below:
Data Compliance Level
The DATA COMPLIANCE LEVEL is automatically defined when the data files are uploaded. It’s represented with stars, from 1 to 3.
The data compliance level informs you about the compliance of data file formats with recommended file formats for preservation. This is only an indication; the system won’t block the deposit if a file doesn’t get 3/3 stars. The reference file formats were defined according to the recommendations of the Library of Congress and implemented through the technical registry PRONOM of the U.S: National Archives.
Submission Policy
You can choose a submission policy when you ask for the creation of an Organizational Unit. In case you wish to modify it, please contact us > Yareta IT Support.
Available options:
-
DEPOSIT WITH APPROVAL means that the dataset needs to be validated by a member of your organizational unit with MANAGER, STEWARD or APPROVER rights before being archived. They are chosen by the MANAGER who set this up in the Organizational unit’s settings. See Organizational Unit, Members and Roles, and OrgUnit settings.
-
DEPOSIT WITHOUT APPROVAL means that no validation step is required in the archiving process for your Organizational Unit. Once SUBMITTED your deposit is directly archived and published.
Preservation Policy
The preservation policy defines the period during which the archive will be preserved. At the end of the preservation period, the archive is deleted but a trace of the archive is kept (the metadata is kept as a “tombstone”).
Available options:
-
KEEP IT FOR 5 YEARS.
-
KEEP IT FOR 1O YEARS (recommended by the SNSF).
-
KEEP IT FOR 15 YEARS.
-
KEEP IT FOR 20 YEARS.
-
KEEP IT FOREVER.
The disposal process determines the fate of the archive at the end of its retention period. There are two options to choose from once the retention period has ended:
-
Extend the retention period
-
Dispose of the data while preserving the metadata as a "tombstone"
| We will contact you at the end of your archive’s retention period so you can decide which option to choose. |
CONTACT & SUPPORT
To request an ORGANIZATIONAL UNIT (preservation space) on Yareta:
-
For UNIGE researchers > Support SI.
-
For researchers from other Geneva’s Higher Education Institution > Support.
Yareta IT Support
To ask questions on Yareta features, access to the platform or the sandbox, submitting invoicing questions, etc.
-
For UNIGE researchers > Support SI.
-
For researchers from other Geneva’s Higher Education Institution > Support.
-
FAQ > https://www.unige.ch/eresearch/en/services/yareta/faq.
or write to yareta-support@unige.ch.
Support for system integration
(For developers) to obtain personalized and customized support to integrate the DLCM technology (used for Yareta) to their own IT system:
-
Contact our IT team > eresearch@unige.ch.
-
Technical Documentation > DLCM Integration Guide.
Research Data Support
To find best practices on data management throughout the data lifecycle as well as guidance on legal, ethical and funding aspects.
-
For UNIGE: https://www.unige.ch/researchdata/en/.
-
For The Geneva Graduate Institute: https://libguides.graduateinstitute.ch/rdm.
-
For HES-SO: https://www.hes-so.ch/recherche-innovation/open-science/open-data.